
Every home has one. A star. Or two, maybe more. Everyone
wants to be one but it is truly only a few that stand out and deserve this
honor. You too can be the star of the house. All it takes is a little paper,
string lights and some magic. Everyone needs a Lit Paper Star Garland in their
life. Drape one over a dressing mirror, or across a window or give as a gift. This Paper Star Garland can grace your home year round. And you will see how easy it is to be The Star Of The House.

This is what you need to make the Lit Paper Star Garland-
Star Pattern
White Cardstock
X-Acto Knife
Scissors
Straight Edge
Awl
Darning Needle
Bakers Twine
Hole Punch
All-Purpose Acid Free Gel
Spray Adhesive
Pencil
White Mini Lights, 35 count
Cutting Matt or Board
This little project can be a little time consuming and
repetitive. If you break it down into
small segments, it can be a little less overwhelming. Throw your stars into a
tote wherever you go and you can easily accomplish a cutting, folding, or hole
punch phase. Make good use of bleacher time.
Start by downloading this perfect star templet.


Make a photo copy of your star. The star should measure
about 5 ¼” from tip to tip. The solid line is the cutting line, the dash lines
are the scoring line.

Apply spray adhesive (in a well ventilated space) to the
back of the sheet of the star.


Carefully lay the sticky side down onto a sheet of
cardstock. Gently press and smooth out. Let dry.

Once the adhesive has dried, cut out your star. This is your
pattern for tracing your stars. Cut only the solid lines.


To make ten 3-D stars, you will need to trace twenty stars.

Cut out your twenty stars.

Use a straight edge to guide your X-Acto knife to lightly
score all the dotted lines on the stars. Do this step with caution, if you
press down too hard you might cut through the paper and then then you will have
to make a new star. Just for practice, test out a few passes with the knife on
scrap paper before you start on the stars.


Start with making two score lines down the middle of the
star to find the center. Score between point A to point A. Score between point
B to point B. Where your two lines intersect is the center point.


Now lightly score all the lines on the inside of the star by
starting at the center point, all the way around, like a wagon wheel. See dash
lines on the pattern as a guide.


Score all the tabs.

Score all remaining stars, lines inside the star and all
tabs.


Turn the star over and fold all the score lines that end at
the tip of the star (the longer score lines).
Fold all the shorter score lines in the opposite direction
of the previous fold.
Fold all the remaining nineteen stars in the same method.


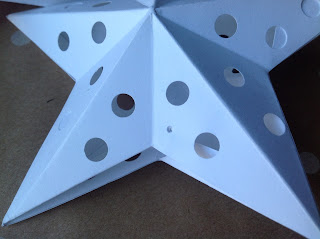
Using your hold punch, punch out holes on each star. Use two
or three holes between each of the folds. Make sure you do not punch through a
fold or a score line.


Fold four tabs toward the inside of the star. Fold the remaining tab to the outside of the star.


With two stars lying up, apply gel to the four inside tabs
(tabs folded to the inside of the star). Do not apply gel to the tabs that are folded
to the outside.
Let the gel sit for a minute or two. This allows the
construction process to go smoothly. Using acid free gel will prevent the gel
from discoloring and ruining your stars over time.


With one star in each hand, align the two tabs that are
folded out. Carefully bring both stars together making sure to tuck the tabs
with gel to the inside of the star.


Line up all edges. Pinch together intersections and hold for
a moment. Rotate and make sure all seams are even, and hold. Take your time
with this step. The gel is flexible, it does not harden on contact and will
allow you time to adjust placement. When selecting your gel look for one that
is not only acid free but one that dries clear. No worries if you get a little
gel on the outside of the star.

Glue the remaining nine stars. Let dry overnight.

Test your string lights.

There will be an opening or pocket created where the two
unglued tabs meet.

Fold the two tabs that are on the outside of the pocket to the inside of the star.


Use the awl to punch two tiny holes (just big enough for your needle to pass) near the opening, one on each side of the star opening.

Fold the two tabs that are on the outside of the pocket to the inside of the star.


Use the awl to punch two tiny holes (just big enough for your needle to pass) near the opening, one on each side of the star opening.

Starting on about the third light, place one light into the
opening of the star.


Thread your darning needle with twine and “sew” the star
together by sliding the needle through the tiny hole, between the wires (use
caution not to split the covering on the wire) and out through the back tiny
hole. A nice thing about a darning need is it has a large eye which allows thin
string or twine to be threaded through. It also has a rounded point, less
likely to damage the wires.

Tie a knot.

Tie a star on every third light or so until all ten stars
are attached. Now you are done.

Give your kitchen a little attention...

String them on a mantle...

Ot two...

Through a canopy…

Over a mirror…

In the laundry room...

On top of a bookcase...

Or make a few and connect them together and run across a
railing.

These little star lights will light up your life and add a
little magic to your day and perhaps a little romance to your evening. Plug your stars into a timer and set so the lights are on greeting you when you arrive home. Make a
few to give as a gift and keep a few for your favorite reading spot and see how it feels
to be The Star of The House. Beautiful.

