Saturday, September 24, 2016

WARM WELCOME

0


Go throw out that worn out, dated welcome mat, now. And replace it with a friendly custom greeting with one that you really mean. Welcome your friends, family and even your favorite delivery person with a ‘welcome to my home’ message that is uniquely yours. Curb appeal that will have everyone wanting to stop by just to take a look. Love your front door.

This is what you will need-


Stepping Stone Mix-Purchase here…Link
Alphabet Cookie Cutters- Purchase here...Link
Wood Board
Painter’s Tape
Mixing Container
Small Spatula
Vegetable Spray
Vinyl Gloves and Mask

Most concrete mixes have large stones blended in the dry mix to add strength once the mix is set.  Great if you are building a road. This stepping stone mix that we are using is a compound that is fine in texture, perfect for small details, like our letters. But once set and dry, our letters will be strong and durable. And yes, you can walk on them, if you like. Best of all you can leave the letters outdoors all year.


Start by arranging your letters on the wooden board.


With small strips of painter’s tape, secure each letter to board.


Spray a light coat of vegetable spray on the inside edge of all the letters.


Add a little water to the bottom of your mixing container, then add a small amount of the stepping stone mix. Stir.


Keep adding small amounts of mix to water. Stir until it looks like brownie batter.


Scoop small amounts of the mix into the cookie cutters. Fill all the way to the top. You can use your finger to push the mix into corners and to smooth the top of the letter.

You should not have any of the mix running out from the bottom of the cookie cutter onto the board. It will be fine if this does happen, it won’t hurt the letter, just delay the drying time. And a little bit messy.


Leave the board on a level surface to dry. If you have to move your board, do so as soon as possible so as not to cause cracks in the letters.


Leave to dry for 24 hours.


The next day, remove the letters off your board and flip bottom side up. Remove the painter’s tape. Let dry another 24 hours.


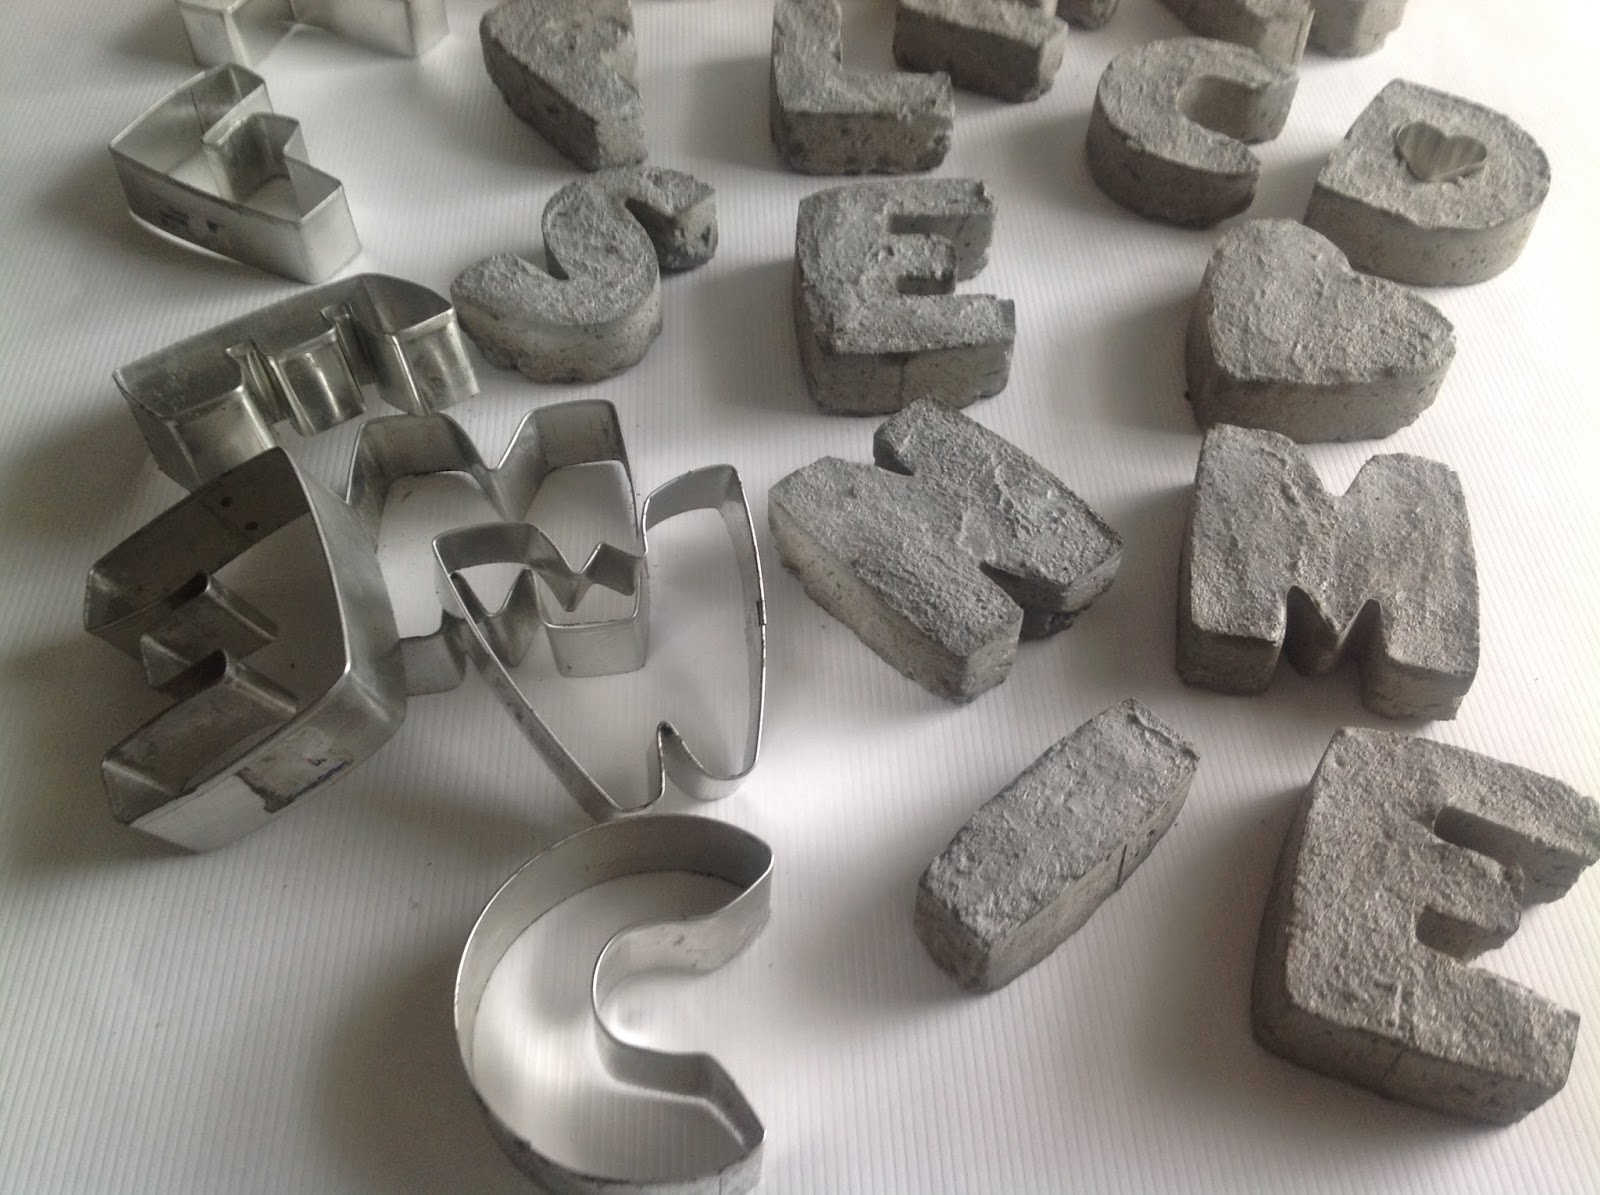
When completely dry, carefully remove each letter from the cookie cutter.


Find the perfect spot by your door and arrange your letters. 


Saturday, September 10, 2016

TEA TOWEL PILLOW

0


Pillow love. There is something about a cute pillow that makes us pause and reflect. But. WHERE WILL I PUT ANOTHER PILLOW? Well, there is always a space, a nook or a quiet chair just begging for a pillow. In my house they get shuffled around from season to season, room to room, or shifted just on a whim. Keeps your house fresh. Like shoes, you can never have enough pillows. Our family motto is “it is good to have inventory”. Enough said.


This simple pillow is a quick and easy. Provided you can sew. If not, your local upholster or seamstress/tailor at your dry cleaners can easily accommodate this pillow for you. You just need a few items, (no zipper!) and it can finished in about an hour. How great is that? Let’s get started…


So many fun printed quotes found on tea towels today.


This is what you will need-


A Tea Towel
¾ Yard Coordinating Fabric
Pillow Form 12" x 16"- Link here..
Ribbon
Tape Measure or Straight Edge
Square
Pencil
Thread
Scissors
Pins


To get started, first wash and dry your fabric and tea towel. Iron to smooth wrinkles.


Measure your towel. You will need approximately 18" x 14” of fabric for the pillow front. My towel was just slightly smaller, so I had to remove the stitches from the seams.


This is the pillow front.


Measure the length and width of the design to determine the center, Mark with pins.


Measure out 9” from the center to the right and left of the design and mark with a pin.


Measure out 7" from the center to the top and to the bottom of the design and mark with a pin. You now have a 18" x 14" rectangle.


With your straight edge draw a straight line with a pencil on the four sides that you have marked with pins. Look closely at the fabric to make sure your lines are on the strait of grain for both directions. Use a square to make sure your corners are square. Your pillow front should measure 18" x 14".


Cut out pillow front. Set aside.


On your coordinating fabric, remove with scissors the salvage, and discard. This will become the pillow back.


With your straight edge measure and cut a rectangle 16” x 14".


From the same fabric, measure and cut another rectangle 7 1/2” x 14”.


On both of the two pillow back rectangles, of the 14" length side, measure and fold back edge ¾”. Press.


Measure and again fold back the same edge 1”. Press.


Pin these edges.


Topstitch both pieces on the fold.


Cut two lengths of ribbon, 16”.


Turn and pin ¼” of one of the cut edges and press.


Turn again ¼” and press. Pin to hold fold.


On both of the rectangle pillow backs, find the middle or half point by the finished edge and mark.


Measure over 2” and mark with a pin. This is where you will place one of the ribbon ties that you have folded and pressed. Note the direction of the ribbon.

Topstitch ribbon in place.

Repeat for the smaller rectangle.


Now place the pillow front on a flat surface. This is the “right” side.


Place the 16" x 14" pillow back rectangle onto the pillow front with the pattern side (right side) facing the pillow front. Right sides together. Pin in place.


Place the 7 1/2" x 14" smaller pillow back rectangle onto the pillow, right sides together. Pin in place. 


Make sure the ribbon ties are not near a seam so they will not get sewn in a seam.


Sew all four sides, reinforcing the corners.


Clip the corners and remove excess.


Press seams open.


Turn pillow right side out.


Carefully push corners with a pencil or with a point turner (if you have one).


Press the pillow flat.


5/8” from the edge, topstitch all four sides.


If you look inside, the topstitching catches the seam. It is a clean finish. Nice.


Fold twice, press, pin and topstitch the two unfinished ribbon ends.


Stuff pillow and tie ribbon to form a bow.


One could go here,,,


One here...


One here...


Or one here... One can never have too many. There's no place like home.