Saturday, January 30, 2016

A VALENTINE'S BREAKFAST IN BED

3


Love is in the air! Wanting to surprise someone special with a little Valentine’s Day love? What about a sweet little tray of relaxation to start your day? Here is a simple, yet thoughtful plan…coffee, tiny hand pies and a pinch of love! And see where this sweet day will take you!


Start with a nice tray. I used my favorite wine crate. A fantastic flee market find that doubles as extra wine glass storage or to tote cookies to an event. It even came with little red handles! Fill it up, and then turn it over it becomes a mini table, just the right size for two. A carafe filled with steamy coffee, mugs, the morning paper and a couple of pies is all you need. Make your hand pies a day ahead. Gather your tray the night before. In the morning, add coffee, paper, pies and you are ready to make someone smile.


Heart Shaped Hand Pies-

2 Cups Flour
¼ Cup Sugar
¾ Cup Shortening
¼ Cup Ice Water
1 Tablespoon Vanilla Flavoring
Cherry Pie Filling
Decorative Sugar 


Blend flour and sugar together. Using a pastry blender, cut the shortening into the flour/sugar until it starts to form small pea size balls. Measure ice water, add vanilla flavoring to water. Blend ice water into the flour/sugar/shortening. It should easily form into a large ball by hand. Sometimes a couple additional teaspoons of ice water may be needed. Divide the ball into two smaller balls. Place in a zip lock bag in the refrigerator for a half hour.

Preheat oven to 350 degrees.


Sprinkle flour on your work surface and roll one of the balls to about ¼” thick. Cut with a heart shaped cookie cutter. I used a 3 ½” heart. Place on parchment paper and baking tray.


Add a little Cherry Pie filling to the center of heart.


With your finger, run a little bead of water around the outside edge of the heart.


With the second ball of dough, roll out and cut heart tops. Cut a smaller heart out of the center, remove but do not discard.


Place the heart on top of the heart with the pie filling.

With your finger press the two hearts together all the way around the heart to seal.


Using the prongs of a fork, press over seal to secure top to bottom.

Add a touch of water to the small heart cut out, and place on edge of pie.


Brush or mist with water the entire pie. Sprinkle with decorative sugar, if you like.


Bake for 20 minutes, or until edge of pie turns golden. Store in air tight container.


With this much love, the morning will become a favorite memory, and maybe, a tradition. The perfect start for a Valentine’s Day. Can a day start any sweeter?


Saturday, January 16, 2016

WINTER LUMINARIES

2


Winter Love. Unless you love falling snow, freezing rain, closed schools and super cold temperatures, it is probably not your most favorite time of year. But it is here. Nothing better than a little glowing light to greet you when you arrive home. With the addition of a few toasty lights scattered around your home, the frosty weather will be chased away. And your heart will warm. Perhaps, winter will become your love.


Here are two simple, not-so-time-consuming little projects that will take your mind off the temperatures outside, and have you dreaming of warmer days.  


This is what you will need for the Birch Star Luminaries-


Birch Vase, link here…..
X-ACTO Knife, with a sharp blade
Pencil
Star (I used a 1 ¼” cookie cutter t trace)
Paper
Scissors
Tape


Start your Birch Start Luminary by removing the plastic liner, cardboard band, staples and metal rim. Discard.


Trace your star onto a piece of paper and tape to the side of the Birch. You can cut out as many stars as you like. I cut out three stars on each of the Birch Luminaries.


With your pencil, trace your star.

Remove your paper star.


Starting at the tip of each star, lightly score the wood all the way around the star. Repeat several times, pressing a little harder with each pass. My stars took three to four passes to clear the Birch layer.


When the star is completely loose, gently pull the star away from the luminary. Do not discard the Birch star. There will be a second soft layer of wood underneath.


With your X-ACTO knife cut around the star to remove the second layer. Discard the wood.


Because the luminary is made of wood, use a battery powered candle to light.


This is what you will need for your Winter Script Luminaries-


Glass Jars
Twine
Epsom Salt
Mod Podge
Small Paint Brush
DecoColor Premium Paint Pen, link here…….


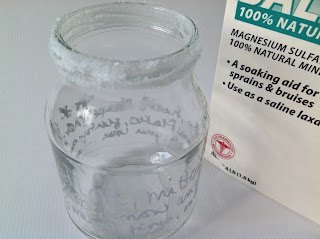
Working in a ventilated area, shake paint pen several minutes. Remove cap and write onto the clean glass jar.


I used some winter quotes from an online search, but you could use any words, quotes or poems that you like. The paint pen is oil based and will be permanent once it dries. With care handling, the paint should not come off. Let dry.


With your paint brush, apply Mod Podge around the top of your jars.


Sprinkle the Epsom Salt on the wet glue. Let Dry.


Wrap and tie twine around the top. Add the star you removed from the Birch, if you like.


Fill jar with the Epsom Salt.


Add a votive or an electric votive.


Two very simple projects. Two very simple projects that will help chase the winter blues away. With the warm glow from these, your home will never feel the chill of winter, nor will your heart. And best of all, winter may become your most favorite season of all. Winter Love.