What is your signature design? The one element you always do when you decorate? My trademark is lighting. Specifically, ambient lighting. Interest lighting. Mood lighting. If it can can be lit, I do it. My thumbprint is all over, inside and out of my home (and a few others). I have heard that my house is lit like Christmas year round. Well, not quite. But each night, one by one, every room in my house is illuminated. And all on timers. So beautiful. So, naturally, mini lights and glass containers are well loved treasure. But there is nothing short of endearing than a power cord coming out of the top of a beautiful arrangement. Buzzkill. Fortunately, there is a simple fix. Drill a hole through the glass. Power cord goes out the back. Hidden. So amazingly simple. So useful. If there is only one new trick you learn this year, THIS IS IT! Yes, it can seem a little intimidating, but if you follow along these simple steps, you will have success. It is very empowering to learn something new, and to put it to use. Nothing finer than taking something you learn and making something beautiful from it.
This is what you will need-
Safety Goggle
Vinyl Gloves
Vinyl Gloves
Diamond Dust Hole Saw
Cordless Power Drill
Small Plastic Container
Glass Containers
LED String Lights
A word about safety. Always use safety goggles. Use vinyl gloves
to protect your hands. A cordless drill because your project will be in or near water. Remove any jewelry, bracelets. And most importantly,
pull your hair back and put it in a ponytail!
This is the hole saw that I use for glass. It is a most excellent hole saw. To purchase...Link here.
I used the smallest saw for this project, 5/32". It is the perfect size for the LED mini lights. The package contains multiple size bits for all your different projects.
This is the hole saw that I use for glass. It is a most excellent hole saw. To purchase...Link here.
I used the smallest saw for this project, 5/32". It is the perfect size for the LED mini lights. The package contains multiple size bits for all your different projects.
Lets get started. Rinse your jar with water and dry.
Place your plastic container in the sink. Fill the container
with about 1” of cool water. When drilling it is best to keep this project cool. You can keep
the saw and the glass cool with the water in the container. If the saw and glass gets too
hot the glass may crack or break.
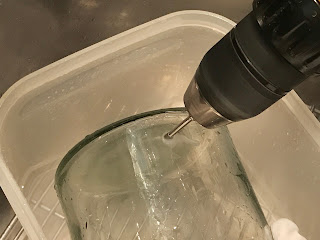
Hold the jar and place the drill bit near the bottom of the
jar. Hold the drill at a 45 degree angle to start.
Start drilling, the saw will jump around a bit, but once the saw starts to 'bite' into the glass, the drilling will go very smoothly. Try to
hold the saw in one location for about 30 seconds to make a small divot, or crescent, little dip in the glass that will hold the drill bit in place.
This is what your crescent/divot should look like. Just a little dip in the glass to get things started.
Once you have your crescent, place the saw in the crescent, hold the drill at a 45 degree
angle and start drilling, bring the drill up medium to almost full speed.
Slowly start raising up the drill, keeping consistent almost full speed until
the drill is at a 90 degree angle to the jar.
Drill for 30 seconds.
Drill for 30 seconds.
Stop and roll the jar into the water to cool and rinse. Dip
your saw in too.
Place the drill back at the 90 degree angle and continue to
drill with the same almost full speed. Let the weight of the drill do the work, do not push down on
the drill.
After 30 seconds or so stop drilling, rinse the jar and dip
the saw in the water.
Return drill to the 90 degree angle and continue to drill.
Stop every 30 seconds or so to cool the saw and rinse the soon to be hole in the water.
When the bit clears through the glass, you will hear a
little ‘pop’.
The drill took about 2 minutes from start to finish. This is a variable depending on the speed of the drill and the thickness of the glass you use.
Clean your glass with soap and water. Sometimes there
will be a little white dust residue and it is best to remove it promptly.
Run your lights run through the hole.
And add two holes near the rim, a little string, and you have an instant hanging vase...
And add two holes near the rim, a little string, and you have an instant hanging vase...
Perfect under glass...
Or a tucked away spot...
Or in a corner...
Or here just because...


