Yes, spring is one of the most beautiful times of the year
in Northern Virginia. The chance to be new and fresh again. Time to move
outside and enjoy the outdoor space. For me, spring is also a time to assess what
winter has done to the property. My beautiful patio furniture has not weathered
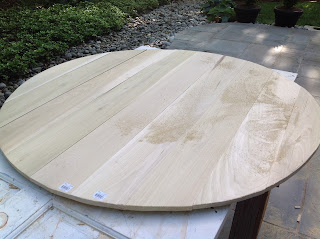
so well these past few winters. The table was needing a little love. So, I thought what if I create a temporary table top that could be
removed at the end of the season? Or changed on a whim? A
wood tablecloth. And of course, a classic painted design. Perfect.
This is what you will need-
Wood Boards (11- 48" x 1/2" x 6" and 2-48" x 1/2" x 2")
¾” Wood Screws
2” Circular Drill Bit
Power Drill
Jig Saw
String
Gorilla Glue
Measuring Tape
Sand Paper
Exterior Paint
Primer
Sealer
Paint Brush
Sealer
Paint Brush
2” Screw
String
3” Number Stencils
Pencil
Small Craft Paint Brush
Safety Goggles
Start by lining up 9 of your wood boards.
Cut the two remaining 6” x 48” down to 42”.
Cut the two 2” down to 30".
Glue the support boards onto the face boards across the
width, as shown.
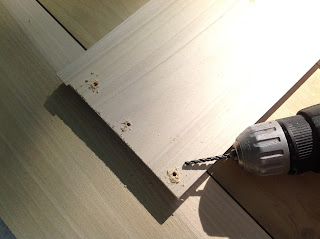
Drill pilot holes, two holes to connect to each face board, as
shown.
Screw in the screws, securing the table top.
Fine the center of the middle board. Drill a hole in the center mark.
Flip the table top over. Screw a 2” screw into the center
hole.
Attach the string to the screw.
Measure 24” on the string and place a mark.
Tie the pencil at the 24” mark. Measure to make sure the tip
of the pencil is 24” from the center.
Mark a circular line all the way around the boards to create
a circle. Measure your circle just to be sure. Measure twice, cut once. Wise
words.
Clamp the boards to a work table to cut. I extended about
1/8th of the top over the edge of the work table. I cut in small
increments, stopped, rotated the top, adjusted the clamps and continued to cut
along the pencil line. Cut slowly.
With your special 2” circular drill bit, cut your center
umbrella opening.
Sand and sand and sand.
Paint the top and bottom with one coat of primer and two coats of
exterior paint. Let dry overnight between each coat.
I thought these French numbers would be perfect...Link here.
I traced each number on 3” scraps of paper.
Then I place 12, 3, 6 and 9 on the board. I filled in the
remaining numbers by eye, placing them in the spaces. Not precision, just close enough.
Once I was happy with the placement, I removed one number at
a time, and with the stencil, traced that number onto the board with the
pencil.
With your paint brush, carefully thicken the line.
Fill in each number by hand painting each number. Let dry.
I used a wreath to accent the umbrella hole, using the same
tracing/painting technique. To purchase...Link here.
Place the table top on your table. Thread the umbrella
through the opening.
And all you have left is…
And relax...


0 comments:
Post a Comment