The air is full of something magical...There must be some little pixie dust floating around because I feel it. Like electricity, it is snapping and sparking all around me. It is there. Just like when a good snow is about to happen. You can just feel it. Maybe you just want to light a little fire, start with this adorable little hug and kisses pillow to send a message. Valentine's Day is just around the corner, and love is always in style. Any time of year. But, when Love is in the air, stand back, because you never know what will happen next. Good to have this little magical pillow on hand, just in case....
A little love affair with cozy places.
A little love affair with cozy places.
1 Yd. Natural Denim...Link here
½ Yard Grey Denim...Link here
Thread, Natural, Gray
14” x 34” Pillow Insert…Link here
This is a close-up of denim fabric. There are two distinct
sides, choose either one, they both are nice.
Wash and dry the natural denim fabric.
Measure, mark and cut two pieces of fabric, 14” x 36”
SETTING A ZIPPER FOR A PILLOW
Finish all edges of both pieces of fabric.
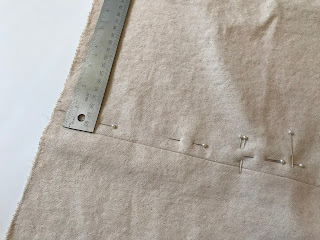
Measure and mark fabric with pins. First, mark the center,
place a pin.
To the left of the center pin, measure 10” and place a pin.
To the right of the center measure and place another pin 10” from the center.
This is where the 20" zipper will be placed.
Lay the second piece of fabric over the top of the first.
Pin in place as shown. Add a second pin to both sides where the zipper will
start and stop.
Sew together the pillow front to the back with a 1”
seam. Start with 9 stitches per inch up
to the point where the first set of double pins are. Change your stitch length to a big long
basting stitch. When you reach the second set of pins, return to 9 stitches per
inch.
Remove pins before while sewing, just make sure not to sew
over the pin.
Always backtack all stitches at the starting point and ending
point. This will reinforce the stitches and keep them from unraveling.
Press open this seam.
Lay the fabric flat with the front and back and one seam
away from you. See as shown.
Notice the seam allowance near you is a single layer.
Measure and mark with a pin 8” from the left side of the
fabric.
Lay the zipper (face down) as shown on the seam allowance at the 8" pin.
Pin the zipper tape to the seam allowance.
Hand baste the zipper tape to the seam allowance using a
thread of contrast color.
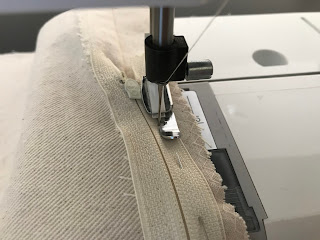
Switch to a zipper foot as shown. Stitch the zipper
(starting at the metal ‘stop’ at the bottom of the zipper) to the seam
allowance about 1/8” from the edge of the zipper tape. See as shown.
Sew entire length of the zipper until you reach the zipper (metal pull) tab.
Stop and lift your zipper foot up with the needle still in the fabric. Pull the zipper tab down
just enough to clear the foot so you can continue to the end of the zipper. Stop
sewing at the little metal ‘stop’.
Flip the fabric over as shown. Make sure the seam is flat.
From the left edge, mark with a pin 8” as shown. Then
another pin 8” from the right edge of the fabric. This is where the zipper is to be topstitched. Pin from the front through the seam to stabilize the zipper to the front
panel. See as shown. Double pin the start and stop of the zipper.
Switch zipper foot back to the standard presser foot.
Measure and mark with pencil 5/8” from the seam.
Topstitch the entire length of the seam. Make sure the
presser foot is aligned about 1/8” from the seam.
When you sew to the first set of double pins, remove pins, stop with the needle in the fabric and lift
the pressure foot up.
Lift the fabric up and pull the zipper tab down a few
inches.
Lower the pressure foot and continue to stitch. Once you
reach the zipper tab, lift the fabric and pull the tab back up. Continue topstitching the entire length of the seam.
Flip the fabric over and remove basting stitches.
Lay the fabric toward you as shown.
Pin the second length of zipper tape to the seam
allowance. See pictures.
Switch zipper foot, note the foot is turned to the other
side.
Starting at the top of the zipper, sew the tape to the seam
allowance, down the tape as close as you can get the needle to the teeth of the
zipper.
Stop at the bottom of the zipper.
Flip fabric over, pin the start and stop of the zipper.
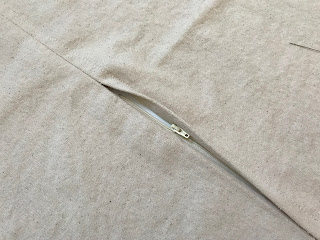
Carefully remove the basting stitches between the two pins.
You will see the zipper once the stitches have been removed.
Unzip the entire length of the zipper.
Push the fabric away from the zipper teeth and pin in place
as shown.
Switch direction of zipper foot.
Start stitching (really you are just topstitching the fabric
down and away from the teeth) at the top of the zipper. Press the fabric away
as you topstitch the fabric. Remove pins as you sew.
As you reach the zipper tab, stop sewing, keep the needle in the fabric. Lift foot and pull the zipper tab up to clear the foot.
Continue stitching until you reach the end of the zipper.
Switch back to the standard pressure foot.
Topstitch across the both the top and the bottom of the
zipper to stabilize.
Zipper is done! Lightly press seam with an iron.
Copy and cut out X and O letters.
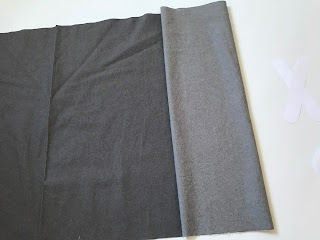
Fold the gray fabric over 4” as shown.
Again, fold the fabric over one more time. There should be
three layers of fabric.
Pin the letters through all the layers of fabric as shown.
With a pencil, trace around the letters.
Remove pins and remove the paper letters without moving the
fabric.
Place pins through all three layers of fabric as shown.
Cut out letters.
Lay fabric flat. Place pins as shown. Starting from the left
the first pin should be 5 ½” from the edge. The next five pins should be spaced
5” apart. There will be a ½” allowance for the seam on the left and right side.
Center the pins by measuring down from the top edge 6 ½”.
Place a pin. See photo.
Your fabric should look like this.
Remove pins from the letters.
Alternate the X and O letters as shown. Center each letter on the pins. Use a straight edge (or T square) to make sure the letters
are all lined up.
Pin the top of the letters to the fabric. Lift the bottom of the letter and run a glue stick down the
middle of the letter.
Lay the letters back down.
Remove the pins from the top and finish gluing the back of
the top of the letters.
Lay the letters down flat and gently press in place. Replace
the pins. Let dry.
Switch thread to gray. Topstitch the letters to the fabric
using small stitches, 15-17 stitches per inch.
Remove pins as you sew.
Wash and dry fabric.
Press any edges that have curled or rolled up.
Lat fabric flat as shown.
Unzip zipper. Don’t forget this step, you won’t be able to
turn your pillow inside out!
Lay fabric flat, lining up edges as shown.
Pin fabric together as shown.
With an ½” allowance, stitch the front to the back, all
three sides.
At the corners, pivot the pressure foot and stitch three or
so stitches, then pivot and continue to stitch. This allows a little room
in the corner once the pillow is turned inside out and makes a nice corner.
Snip the two corners to remove extra fabric.
Press all seams open.
Turn you pillow right side out.
Carefully place insert inside of pillow. Zip the pillow shut and you are done!
Or a kiss will be waiting...


