This is an all time favorite for me. I savior the memories
of my Grandmother’s baking bread. Her bread filling the house with an amazing aroma and steaming
crusts greeting me after a day at school. Impossible having to wait for the fresh
loaves to cool slightly before they could be sliced. Oh, and butter melting on those delicate
white slices…oh la la! Well, she didn’t make French Bread, so this is one of my closest connection to her. Bread making. It is not hard to do, you just need to be
organized. It only takes a few ingredients, most you probably have in your pantry.
It doesn’t take all day, just minutes here and there, with a little free time
between risings. You make a loaf or two, and you will be hooked on fresh baked
bread. Baking bread, just heavenly.
French Bread is one of many traditional breads of France, not to be mistaken for the notable baguette. French Bread has a golden crispy outside and a soft chewy inside. Perfect to eat with anything!
This is what you will need to bake 2 loaves-
- 4 Cups Flour
- 2 (.25 oz.) Packets Active Dry Yeast OR 4 1/2 Teaspoons Dry Active Yeast
- 1 Teaspoon Salt
- 1 Tablespoon Sugar
- 1 3/4 Cups Water (at 115 degrees F)
- 1 Egg White + 1 Tablespoon Water
- Vegetable Oil
Useful tools- candy thermometer-you can purchase in the cooking tools isle at your grocery store. Bread baking pan- a cookie sheet is a good substitute. A bench scraper- or knife. Parchment paper. Plastic wrap. Kitchen towels. A timer. Most importantly, a stand mixer with dough hook attachment If you don't have a stand mixer you can just mix and knead the dough by hand.
Don't fret yeast, it is really a scientific experiment. Fascinating, actually. Just make sure that you have fresh yeast and use a candy thermometer to check the water temperature.
Pour a little vegetable oil into a large bowl and coat the entire inside.
Line your cookie sheet (I use my baguette pan) with parchment paper.
You can use either bread flour or all purpose flour (not self rising) for this recipe. I have used both, they both bake beautifully and taste amazing.
Mix four and salt, then place into the bowl of your stand mixer.
In a 2 cup measuring cup, heat 1 3/4 cups of water. It should take about 20-30 seconds, the water is warm, not hot. Place your thermometer into the warmed water. Yeast grows best between 110 and 120 degrees F. If the water is too warm, it will kill the yeast and your bread will not rise. If it is too cool, your bread barely rises. 115 F tried and true.
Add 1 tablespoon of sugar to the warm water and stir until dissolved.
Add the yeast. It will start to bubble on the top.
Let the yeast proof (or ferment) for 10 minutes. It will will grow right before your eyes! If your yeast does not look like this, throw it out and start over with fresh yeast. Check the packaging for expiration. If your yeast comes in a jar it must be stored in the refrigerator once the jar has been opened. This is the hardest part of making this bread. If you can do this step, you will make beautiful bread.
When the timer goes off, add the yeast to the mixing bowl and turn the mixer to low, or stir.
The mixer will do all the work for you. The dough will quickly be incorporated and start to pull away from the sides.
As soon as the dough forms a ball, see above, let the dough knead for about 1 minute on low or stir. It should be smooth but not sticky.
Lightly coat your fingers and hands with vegetable oil. Remove the dough from the hook and pat into a ball, place into the oiled bowl.
Tightly cover with plastic wrap. Place in a warm, draft free spot. I have a window that I like to use. Cover with a kitchen towel.
Set your timer for 60 minutes. About 30 minutes, lift the towel only to check on the dough. Depending on your house temperature, the rising time can vary. Don't worry if your dough has not completely risen in 60 minutes, just give it a little more time. When the dough has doubled in size it is ready for the next step. The dough in this photo took 45 minutes to rise.
Remove plastic cover. Completely cover your hands with vegetable oil, you will thank me later. Gently push you fist into the dough, letting it deflate. Remove dough from bowl, pat into a ball.
Lightly flour your surface. Place the dough on the flour.
Use a bench scraper or knife to cut the dough in half.
Form two small ovals with the dough.
Cover with plastic, then a kitchen towel. This is the resting stage. Set timer and let rest for 10 minutes.
After resting.
Roll each half, one at a time into roughly 12" x 14" rectangles.
Wet both the 12" sides and one of the 14" lengths with water.
Fold over the 14" length (the length that you did not add water) to the opposite length. See photo. Continue to fold, roll to the end.
Place on baking pan with seam side down.
Gently tuck ends under the loaves.
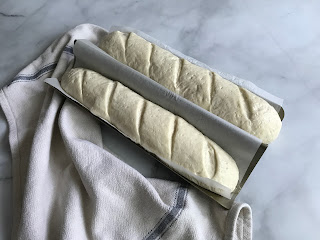
With a sharp knife make 5 or so diagonal slices about 1/4" deep on the top of each loaf.
Add 1 tablespoon water to an egg white, whisk and brush on top and sides of the loaves.
Gently cover with plastic and place in a warm spot to rise for 30 minutes.
Set the timer for 30 minutes. As soon as you set the timer, place a shallow dish on the bottom rack in your oven and fill halfway up with water. Turn the oven on to 375 degrees F.
After the timer goes off, remove plastic, place loaves in oven to bake. Set the timer for 25 minutes. I like to check on the bread as it bakes by peeking through the window, but never open the oven until the time is up. Remove and cool.
Outside...
Inside...
Sooo good...