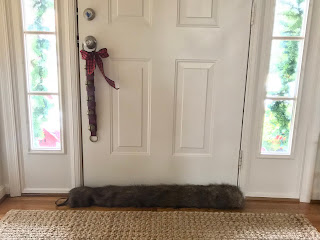
I know you are asking “what is an excluder”... "do I really
need one of these things"? The answer is an excluder is something like a trap
(cage) that keeps pests (rodents) out. And yes, if you cannot tolerate the pesty winter chill from entering your home,
then, most definitely you need a few. This furry little
excluder, pun intended, is the perfect protection you need to keep the cold out
and the warm in. There is no other practical (and dare I say, ever- so -slightly- sexy) way to keep
the draft out and still maintain a level of style to your winter décor. Armed
with this totally functional, yet fashionable excluder, your home will remain comfy and toasty all winter long.
Snug and good looking, a most fetching winter style for any window.
This is what you will need-
Faux Fur
Ribbon
Scissors
Pins
Needle and Thread
Straight Edge
Marker
Rice
Even if you do not sew or have access to a sewing machine,
you can still make this excluder with a little help from your local seamstress
or dry cleaner that does alterations. Cut and pin your excluder, give them
directions, and let them do the sewing, it is just a long rectangle. Very simple.
I purchased my faux fur from a local fabric store, there
were at least ten different styles of faux fur (who knew?) and endless colors to choose
from. You can also purchase my fur…Link here. I purchased 1 1/4" yards of faux fur fabric.
Measure the length of the door, or window you are planning
to place your excluder.
I plan to make two, one for each side of the French doors in
my family room. The length of each door measures 38” long. I will cut the
fabric two inches longer than the door. I would like my excluder to be 10”
wide, and I will cut the fabric 2” wider. So, for finished measurements of 38”
x 10”, the cut measurements will be 40” x 12”.
Along each side of your fabric, there will be a finished edge,
the selvage. If you look closely there are small holes where the fabric was
attached to the loom. These need to be removed.
Turn your fabric over so the back side of the fabric is up.
Lay your fabric on a flat surface and mark a line the length of the selvage
with a marker, using your straight edge as a guide.
Cut and discard salvage.
Now measure and mark on the back side of the fabric your
measurements (40 “ x 12”).
Cut out.
Measure 10” of ribbon and cut.
Fold the ribbon over and stitch together ½” from the cut ends.
Fold your cut fabric down the middle the length of the
excluder as shown, fur side in.
Pin the ribbon loop to one end of the excluder as shown.
On the cut length, find the middle. My cut length is 40”, so
the middle will be at 20”. Place a pin to mark. Now, measure 4” to the left of the middle and
pin, and measure 4” to the right of the middle and pin, as shown. This 8”
length is the opening, where you will turn and fill the excluder. You will not sew in this space.
Double pin the opening. This is a reminder to stop sewing at
the opening.
Pin the remaining cut edges of the excluder, matching the
cut edges together. Tuck any fur back away from the cut edge to the inside as you pin.
Starting at the folded edge, sew all the way around to the
first set of double pins. Stop and reverse your stitches to reinforce where you start and end sewing.
Pick up presser foot and cut threads. Move presser foot to the next set of double pins, and continue to sew all
the way around to the end.
Take care to stop and remove pins as you sew, you do not
want to sew over any pins.
Reinforce the seam by sewing a second row of stitches over
the first stitches. You never know if a 14 year old boy may decide to use your
excluder for batting practice in your basement. Just speaking from experience.
Cut any threads and turn your excluder right side out. Slide
a pair of scissor inside to gently push the fabric to square the corners. Take
care not to poke a hole through the fabric. And don't forget to remove the scissors. Double check to make sure there are no remaining pins left in the fabric.
Pour rice into the opening, fill one side, then the other.
Fill until fairly full. I used close to 9 pounds of
inexpensive bulk rice.
Thread needle and knot end.
Hand sew opening closed.
Place anywhere you need to nip chilly air from entering...
On a recent snowy day, my excluder kept my favorite reading space cuddly warm. Simple. Irresistibly inviting...


0 comments:
Post a Comment