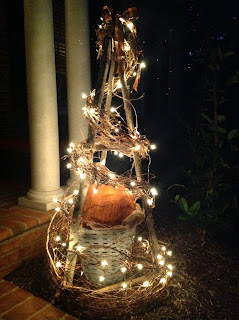
We all know how important an entrance is, the moment all
eyes light on you as you walk into a room.
All holds true for how eyes view your home’s entrance when they arrive
at your doorstep. Entrance Appeal. Some homes just naturally have it. Your home
can have it with this lit Twig Trellis along with a few carefully placed items. It is just what your door needs to greet
your guests or welcome you home. Take a little walk with nature and you too can
have entrance envy of the neighborhood. Entrance Appeal. The house everyone looks
for when they drive by. And all eyes will be on your front door.
This front door entry design can easily transition from Fall, to Halloween to Winter and beyond by switching out some of your decor elements. How beautiful would a pine garland with red sleigh bells and a plaid tartan bow look on your trellis? Or a red, white and blue stars and stripe Fourth of July theme? Just a little imagination and you can easily transform your entry to coordinate with the changing seasons.
This front door entry design can easily transition from Fall, to Halloween to Winter and beyond by switching out some of your decor elements. How beautiful would a pine garland with red sleigh bells and a plaid tartan bow look on your trellis? Or a red, white and blue stars and stripe Fourth of July theme? Just a little imagination and you can easily transform your entry to coordinate with the changing seasons.
This is what you will need for your Twig Trellis-
Six Sticks, about five feet long and about 1 ½” in diameter
2” Deck Screws
Twine
Grapevine or Honeysucklevine Garland (purchased from a local Nursery store)
Mini White Lights, 100 count
Vintage Olive Bucket
Burlap
Pumpkin
Scissors
Pencil
Tape Measure
You will also need access to a saw. I use a power saw, but
a hand saw will work nicely too. A drill and safety goggles.
Begin by cutting three of your sticks to finish about five feet.
I used limbs of a tree from my yard that had recently been pruned. Fresh sticks
will be easier to work with, less likely to split when you are drilling your
holes. Use what you can find. A nature walk is a good place to collect sticks
too.
About two inches from the top of your sticks, pre-drill
holes for your deck screws. I use deck screws because they will not discolor
your wood as they weather.
Secure the three sticks together with the screws. One screw
for each stick into the adjacent stick. You may need a second pair of hands to
help here.
Place your “tripod” over the olive bucket.
Measure the distance between two of the “tripod” sticks,
about 1” up from the bottom of the trellis and cut, adding an additional 1 1/2” for
overlap to make a horizontal base.
Drill holes into the right and left side of your horizontal
stick, then add screws to secure to the “tripod” sticks. Measure, cut and
secure each of the horizontal pieces one at a time. There could be variances
between all the sticks because they are, sticks. Measure twice, cut once. Words
to live by.
Measure up from the base around 30”. This will be about the
midpoint to attach a second set of horizontal sticks. Measure the distance
between each of your sticks and again, one at a time, adding an additional 1 1/2”
for overlap and cut. Drill your holes and secure with screws.
Once the twig trellis can stand alone, wrap twine around all
intersections to cover screws, giving appearance the trellis is held together
with twine.
Gently loosen the vine garland. Begin at the bottom of
the trellis, start wrapping the garland around the trellis, like a candy cane,
finishing at the top. Secure the garland by weaving it through the top of the
three sticks.
Test your mini lights by plugging them in, making sure all
the lights work.
Starting at the top of the trellis, with the “female” end of
the string of lights, gently weave the lights in and around the garland all the
way to the bottom.
Fill the olive bucket with burlap fabric. Place your pumpkin
on top.
Now you are ready to place your Twig Trellis by the front
door.
On to the doorstep. There are several principles of design
to keep in mind when planning your front door entrance. Theme, repetition, and
balance are some of the basics to be considered. We are using a “natural, fall”
theme. Repetition comes in the form of vine garlands, white mini lights, fall
colors, lanterns and pumpkins. Balance, symmetrical or asymmetrical, are in play by
off centered placement of the twig trellis, lanterns, pumpkins, wreath and garland.
This is just good information to know.
However, just follow this placement and you will have
mastered the art of a well decorated front entrance! Place two lanterns on the left
with three pumpkins. One lantern and one
pumpkin to the right. A grapevine garland across the top of the door and down
the left side. Add a string of mini white lights. I found the mini brooms and
tied them onto the garland. A couple of bows in fall colors a wreath and you are set.
With all eyes on your door step, you will have created The
Front Door Entrance of the neighborhood, the house everybody wants to visit.
Entrance Appeal. Welcome home.


