Saturday, November 23, 2019

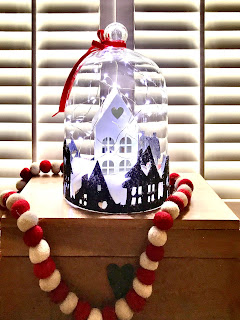
CHRISTMAS VILLAGE CLOCHE

0


And just like that the holidays are upon us. Time to deck the halls and every mantle, table and nook that you can fill to create a warm and cozy welcome home for the holidays. Here is a quaint but classic Christmas village that can decorate your halls from fall through winter. Timeless and transitional. One that can stay long after the tree is gone and the holidays are over. Make one for you you and give one away. A cozy little village for every spot in your little village.


This is what you will need-

Glass Cloche
Gray Felt
Embroidery Scissors
Black Ultra Fine Sharpie Marker
Pencil
Tape
Village House Pattern
Modge Podge Glue
Craft Brushes
Clear Glitter
Small White House


A snowy Christmas Village.


Measure the base of your cloche to determine the diameter.


Cut a strip of paper the length plus two inches by 1".


Wrap the strip around the base. Mark where it overlaps.


Cut at pencil lines.


Download and print houses.


Cut out houses.


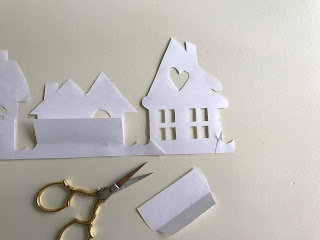
Lay the houses on the paper strip. If your cloche is larger, you can either put more space between the houses or add an additional house to the strip until the strip if filled. If your cloche is smaller, space the houses closer together or use fewer houses.


Once you are happy with the spacing, tape the houses to the paper strip.


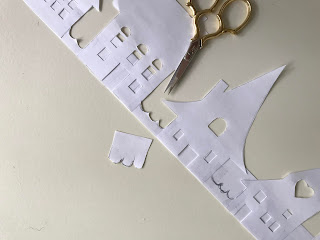
Draw waves to create the look of a fence between the houses.


Cut the paper strip away at the fence.


Flip the paper strip over.


Trim the paper strip away from the houses as shown.


To purchase felt...Link here.


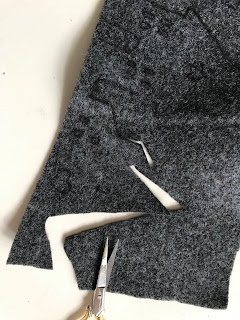
Lay the village onto the felt on a straight edge. Tape in place.


With your sharpie marker, trace around the houses, windows, hearts and star,


Cut the houses out.


To cut out windows and shapes, poke the point of the scissor through the felt. Then snip out the shapes.


Snip out all the windows and doors.


Turn the village over.


Using a craft brush, lightly cover the back of the houses with Modge Podge.


Lay the village around the base of the cloche.


One house at a time press the house onto the glass and hold in place for a few seconds.


Where the beginning and the end meet, add a bit of glue and hold in place, make sure the felt ends touch and there is no gap.


Let dry.


Using a small craft brush, apply glue to roof tops, windows and doors, one house at a time.


Sprinkle clear glitter onto the glue. 


Tap excess glitter off into a small container.


Repeat until all the houses have been glittered. Let dry over night.


Add a small house or any other small object to the inside. To purchase this house...Link here.


One for your table...


Or on your mantle...


Or at your favorite snuggle spot... Happy decorating!

Saturday, November 9, 2019

R IS FOR OYSTER

0


If it is true or not, I have been told that you can only enjoy oysters in the months that have a “r” in the spelling. Such as the "r" in November. November is Thanksgiving. And a huge part of my family’s celebration of Thanksgiving is with oysters. And not just a few, but bushels and bushels of oysters... shucked, dashed with lemon, a splash of Tabasco or dipped in a very fine mignonette sauce and eaten raw (thank you very much my dear sister-in-law, Kathy). Yum. A beautiful tradition we look forward to each year. It is no surprise I love a beautifully set table, and this year’s table is all about the oyster. What to do with all those leftover shells?…oyster napkin rings, of course. Add a little bit of this and that and you will find you have set the most glamorous table of the season. Simple and Beautiful. Memorable.


This what you will need-
Oyster Shells
Bleach
Metallic Paint-Pearl White...Link here.
White Chalk Spray Paint (Optional)
Satin Ribbon
E6000 Glue


Once the oyster has been shucked, run the shells through one cycle in the dishwasher.


Place the shells in a deep dish or container and fill with a ratio of 1 cup water to 1 cup bleach. Cover the shells completely.


Let sit several hours or overnight. You can check on your shells from time to time to see if they have bleached completely. Remove when you are happy with the shell color.


Wash with soapy water and let dry.


My shells never turned completely white and had large amounts of brown color on the outside of the shell. I would have preferred them to be more on the gray side, but that can be quickly fixed. 


Turn the shells so the outside of the shell is up. Just spray lightly with white chalk spray paint and let dry.


A soft white shell,perfect.


Paint one coat of the metallic pearl to the inside of the oyster. Don't worry about the paint lines, they seem to blend and smooth out as the paint dries.


Then a second coat.


Once dry, cut a length of ribbon 50" long.


Place a drop of glue to the back side of the shell.


Lay the ribbon on the glue.


Press down slightly on the ribbon.


Let dry overnight.


Tie the ribbon around the napkin...


Add a few more...


Set the table, dim the lights...


Perhaps you might even find a pearl...magic. Memorable.