Saturday, October 3, 2020

PUMPKIN ROLLS

0


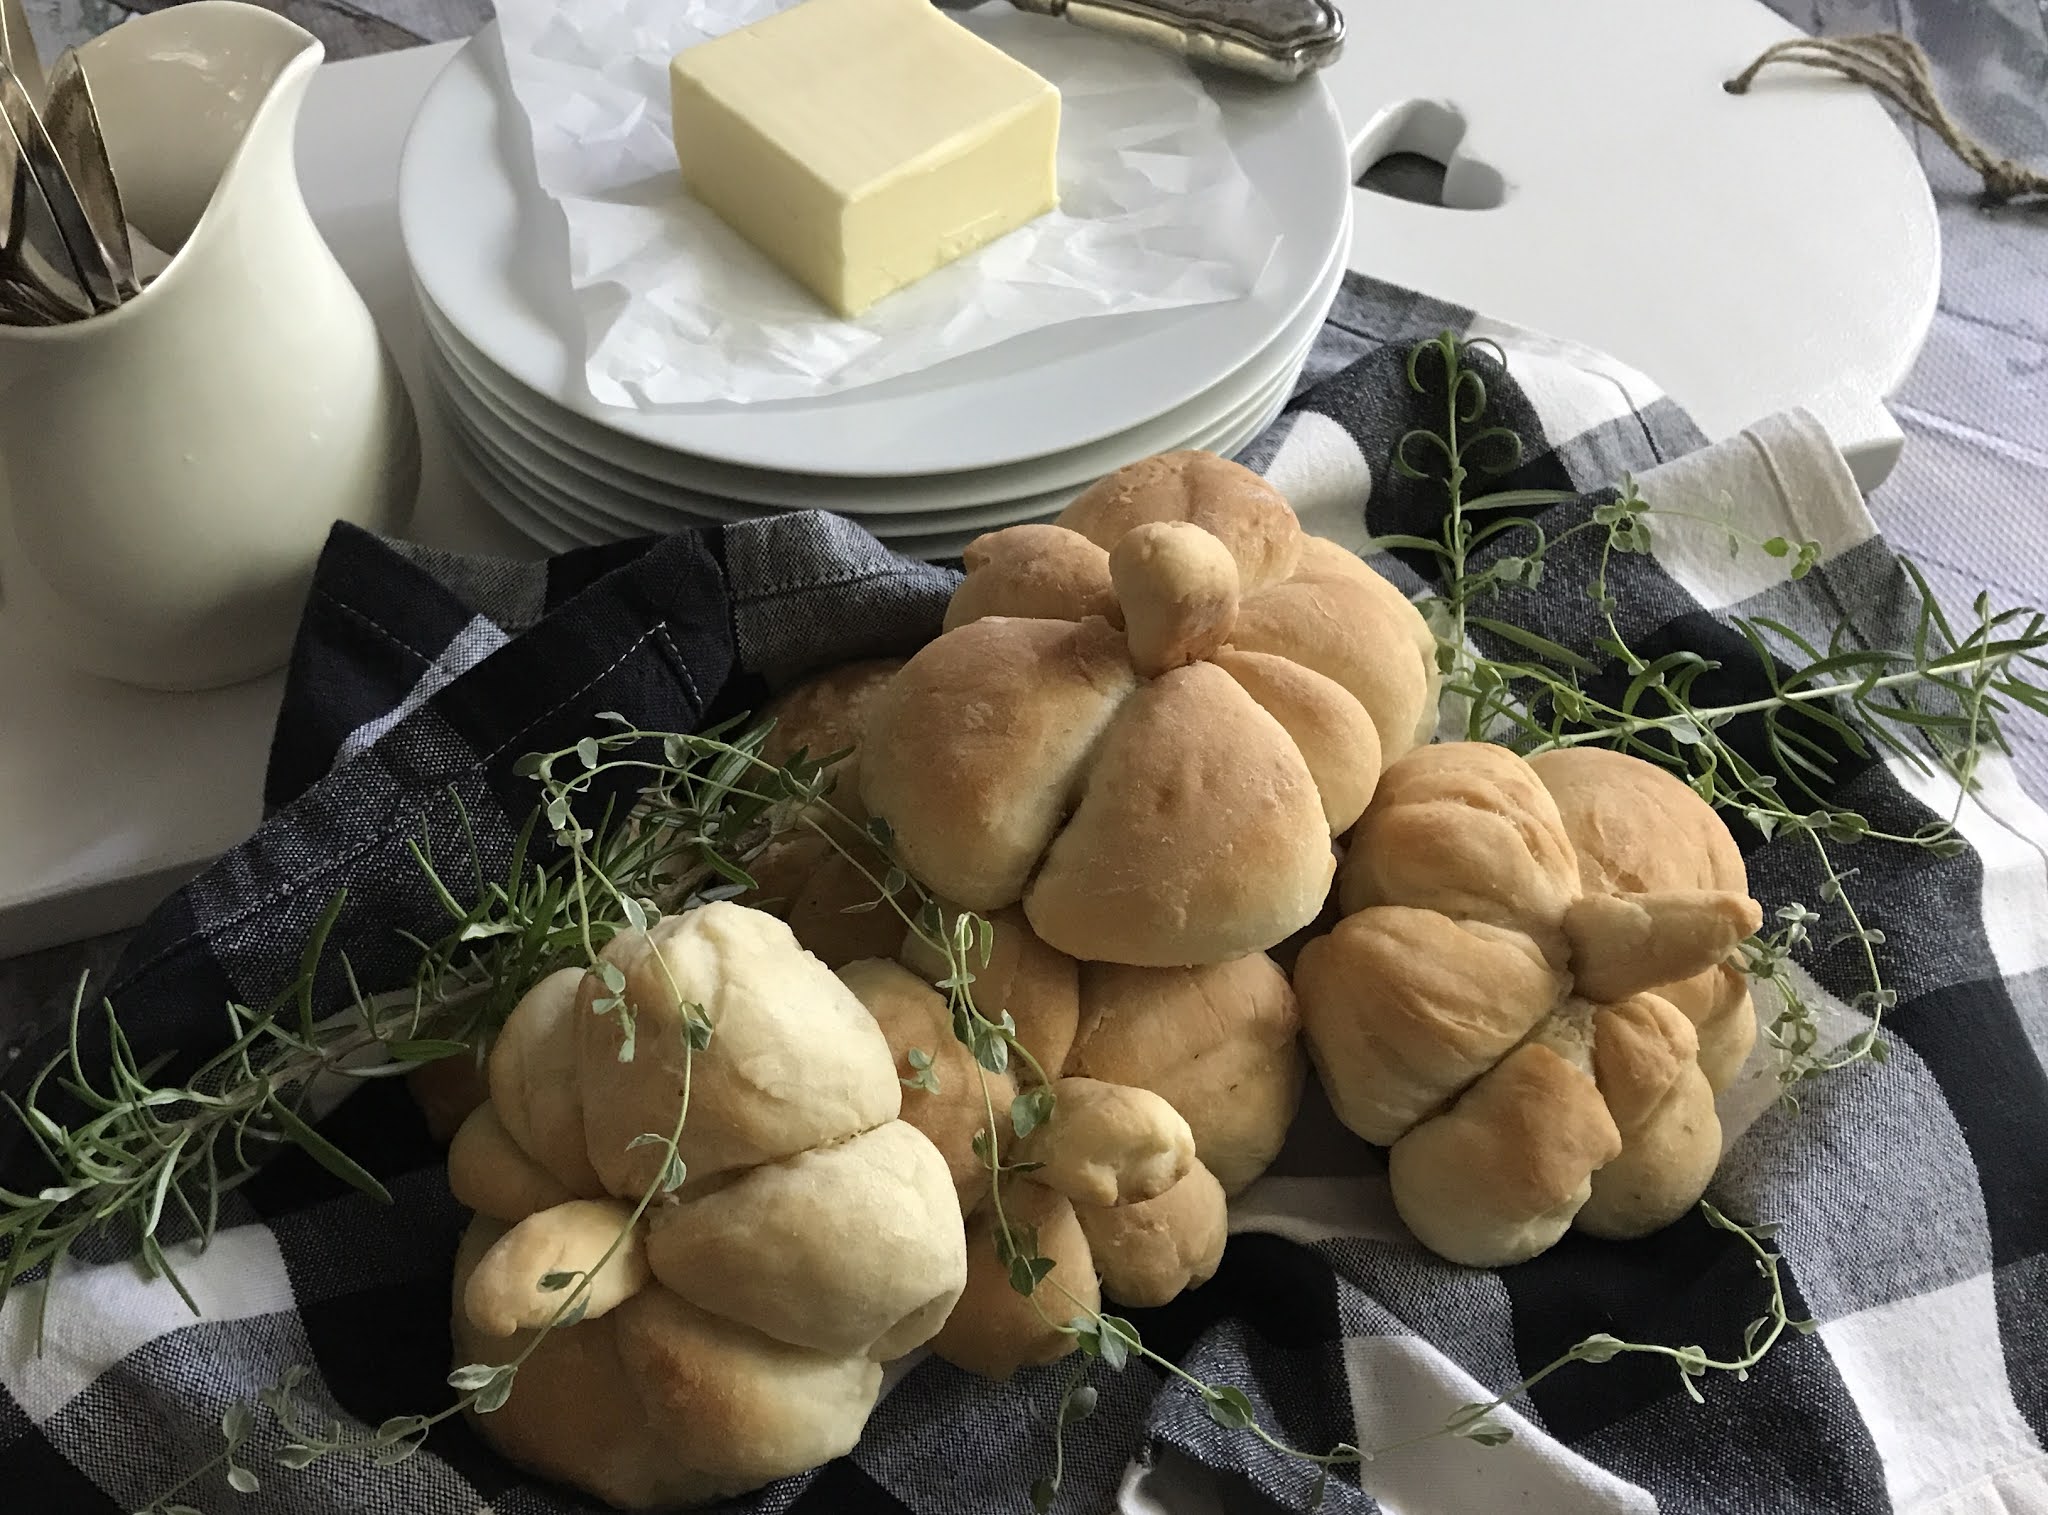
It looks like Pumpkin Season has arrived. Everywhere you look, they are there, pumpkins. There are even a few on my front door step. I’m never completely ready to embrace fall like most, but I have to admit, once the cooler temperatures start, there is no going back and it is sweater weather. And I do love a good sweater! Football has started and so must the annual traditions of leave raking, firepits and slow cookers to begin. A good stew or bourguignon filling a Saturday afternoon air is a must. Along with these great fall meals a warm buttery dinner roll is a perfect side. What better complement to a hearty stew would be a roll shaped like a pumpkin? How fall! Follow my recipe for these easy pumpkin shaped dinner rolls or adapt your favorite dinner roll recipe to make these cute pumpkin sides to add to your fall. They also look really cute just sitting on your table. Let the Pumpkin Season begin!

This is what you will need- 

1 C. Milk

1 Packet Dry Active Yeast (.25 ounce)

1 Tbsp. Honey

4 Tbsp. Melted Butter

1 Tsp. Salt

3 C. Flour

Kitchen String

Vegetable Oil


In a large bowl, grease the inside with vegetable oil. Set aside.

Warm the milk to 115 degree F. Stir honey into the warm milk.


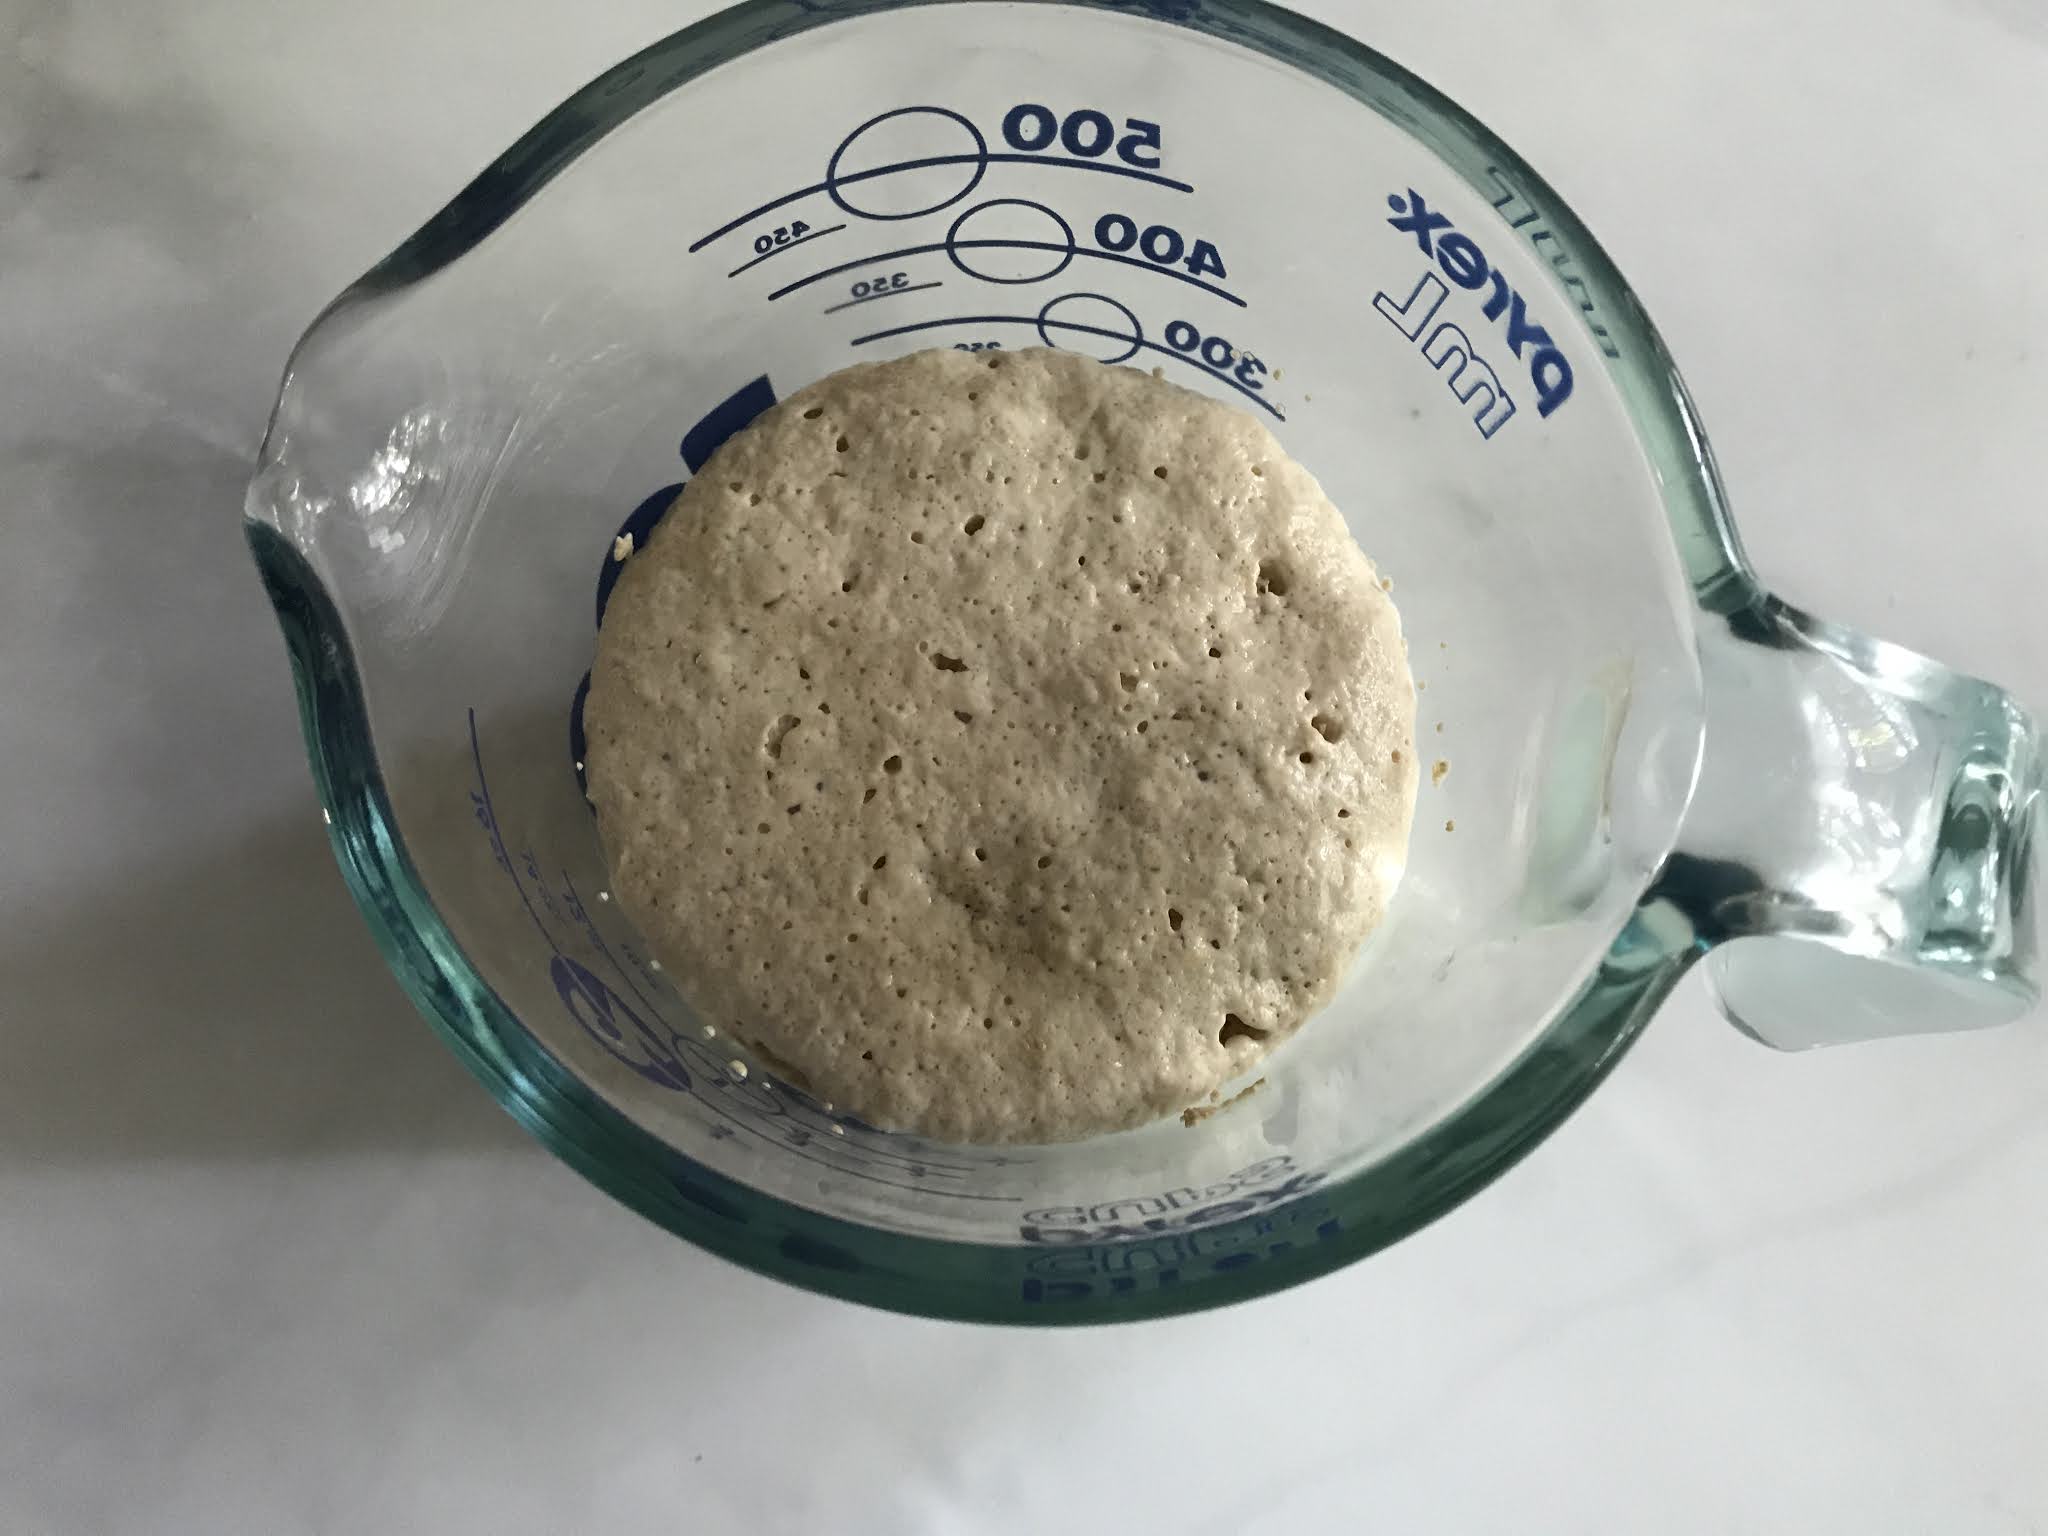
Add yeast and let set for about 10 minutes.

 In a stand mixer, combine salt and flour.

 Add yeast and mix with flour. Add melted butter.

Knead mix on medium speed for about 4 minutes or until a ball forms.

 Place dough into the prepped oiled bowl. Cover with plastic and let rise 1 ½ hours in a warm draft-free area.


Cut 32 approximately ten inch lengths of kitchen string. Set aside.

Sprinkle flour on a work surface.

Kneed dough for two or three minutes. Form into a ball.

 Let rest 10 minutes. 


With a blade scraper, divide ball into two equal halves.


Pull a small amount of dough from one of the halves and roll out to form a long string. Cut into small pieces. Roll each piece out to free form 8 “stems”. Set side. 


Divide one of the halves into four quarters as shown.


Roll each of these quarters into balls. Repeat for the other half of the the divided dough.


Place string into a container. Add a small amount of vegetable oil to soak string, just enough to coat the string.

On your work surface, crisscross three lengths of string as shown.


Place one ball of dough center down onto the string. Tie each set of strings together forming ribs. Repeat until all the strings have been tied.

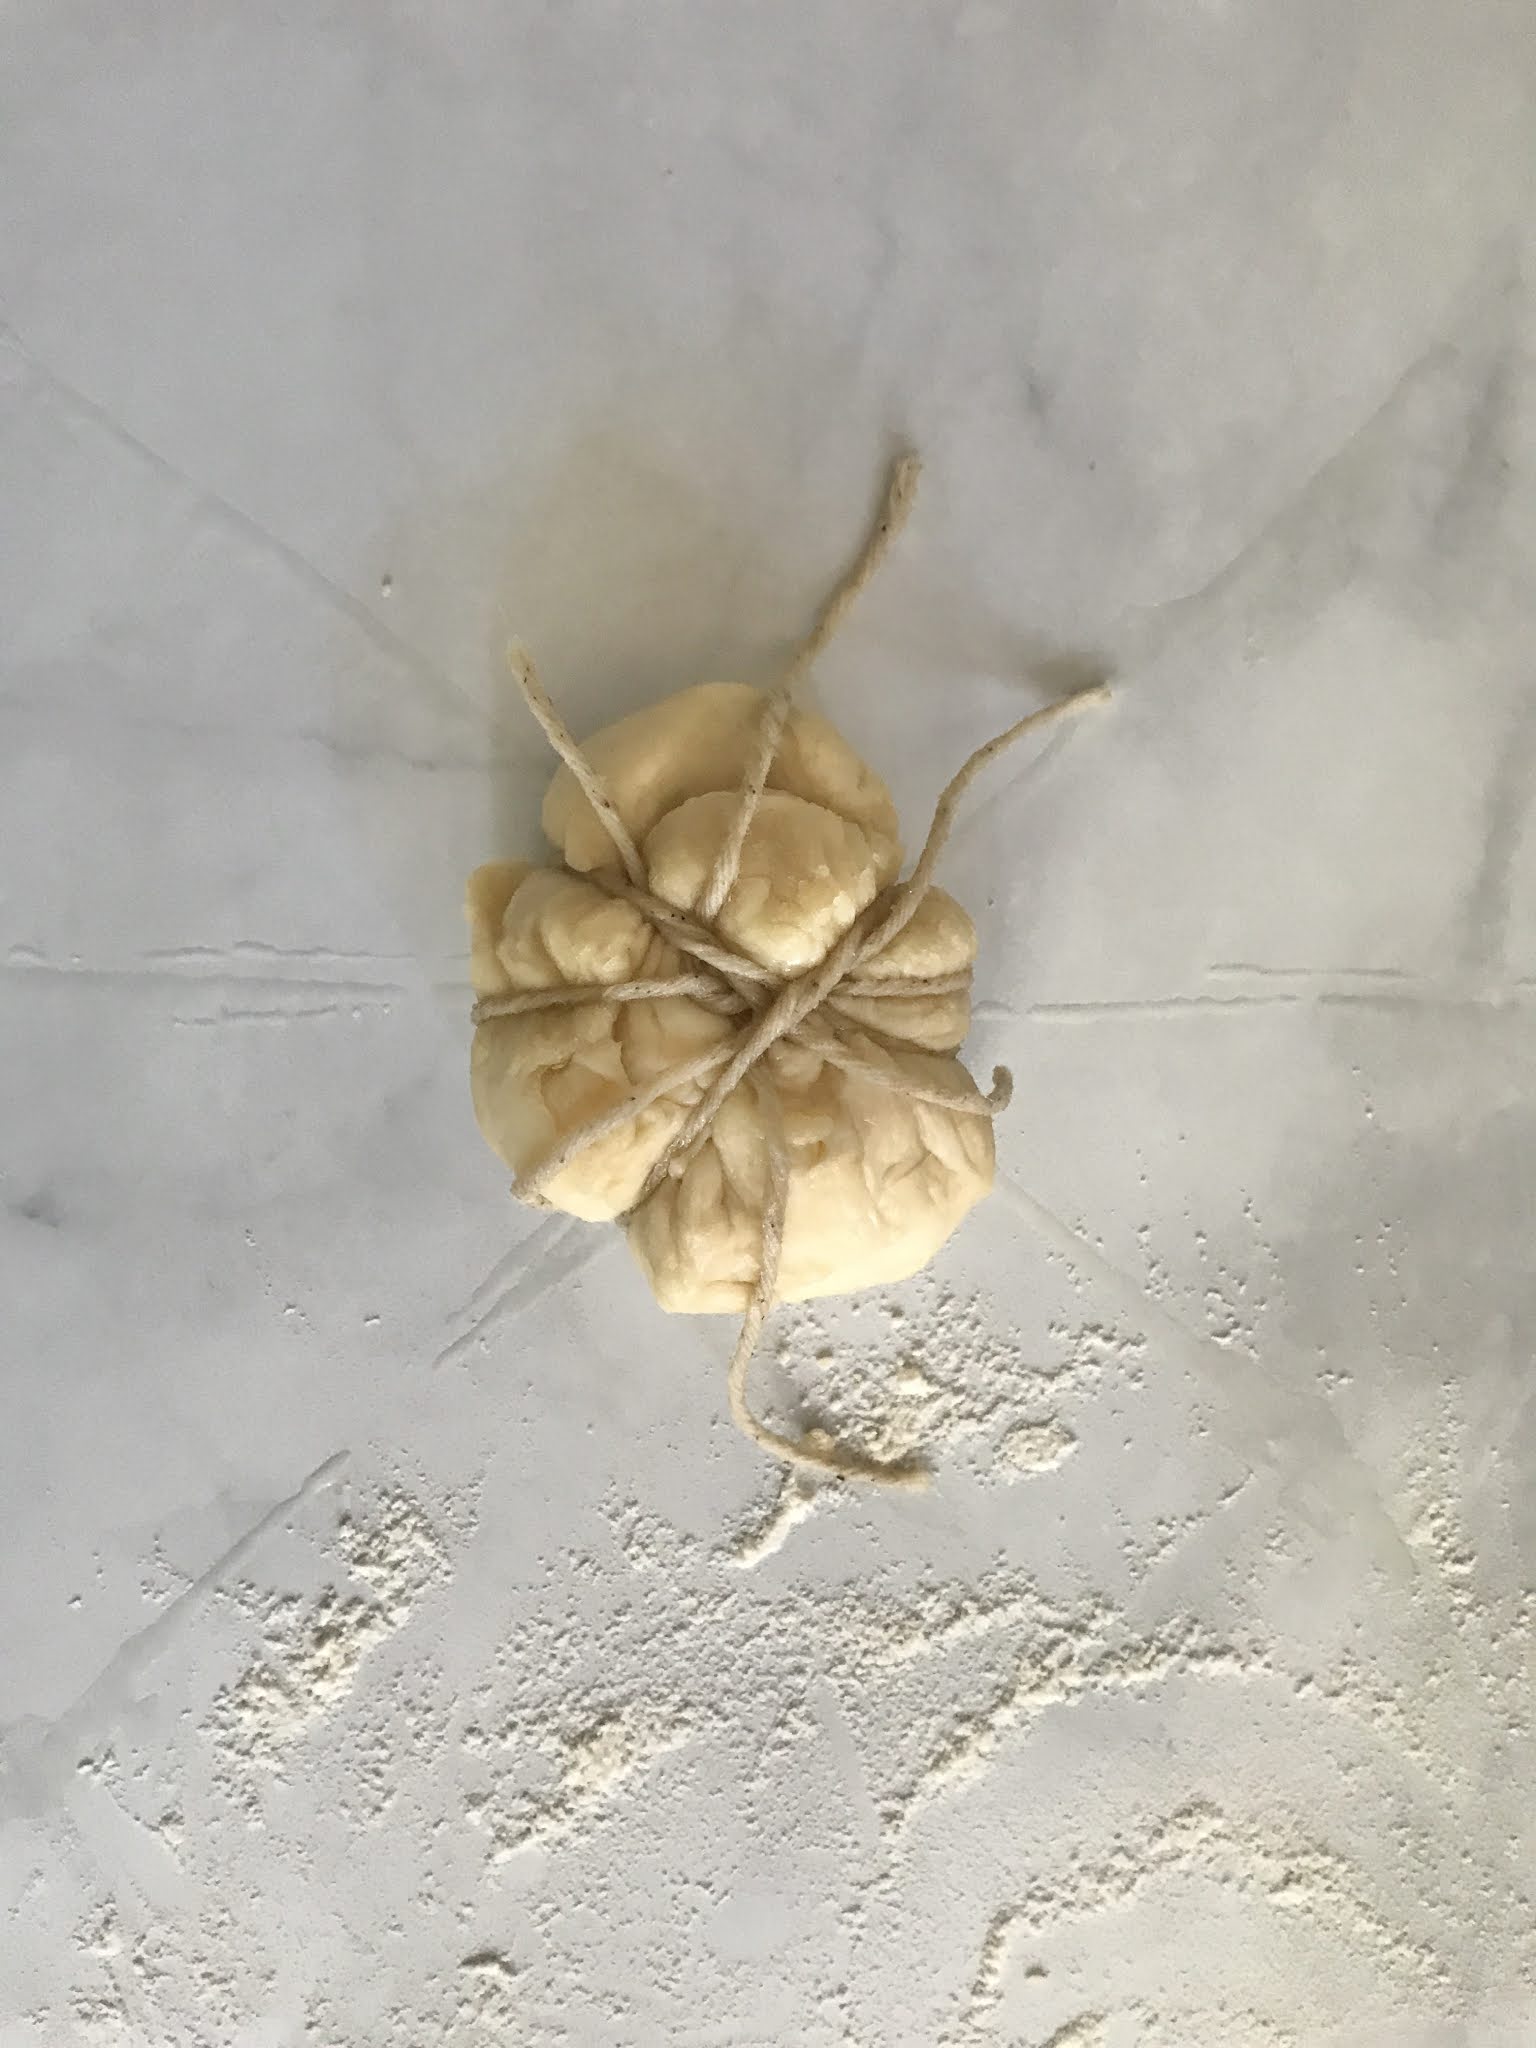
Snip off excess string.


Flip dough over and place knot side down on a parchment lined baking sheet. Repeat for all dough balls. Place a "stem" on the baking sheet next to a pumpkin roll.

Cover with a kitchen towel and let rise for 30 minutes.

 Bake at 350 degrees F for 20 minutes or until just slightly light brown.


Remove rolls from oven. Let cool slightly.


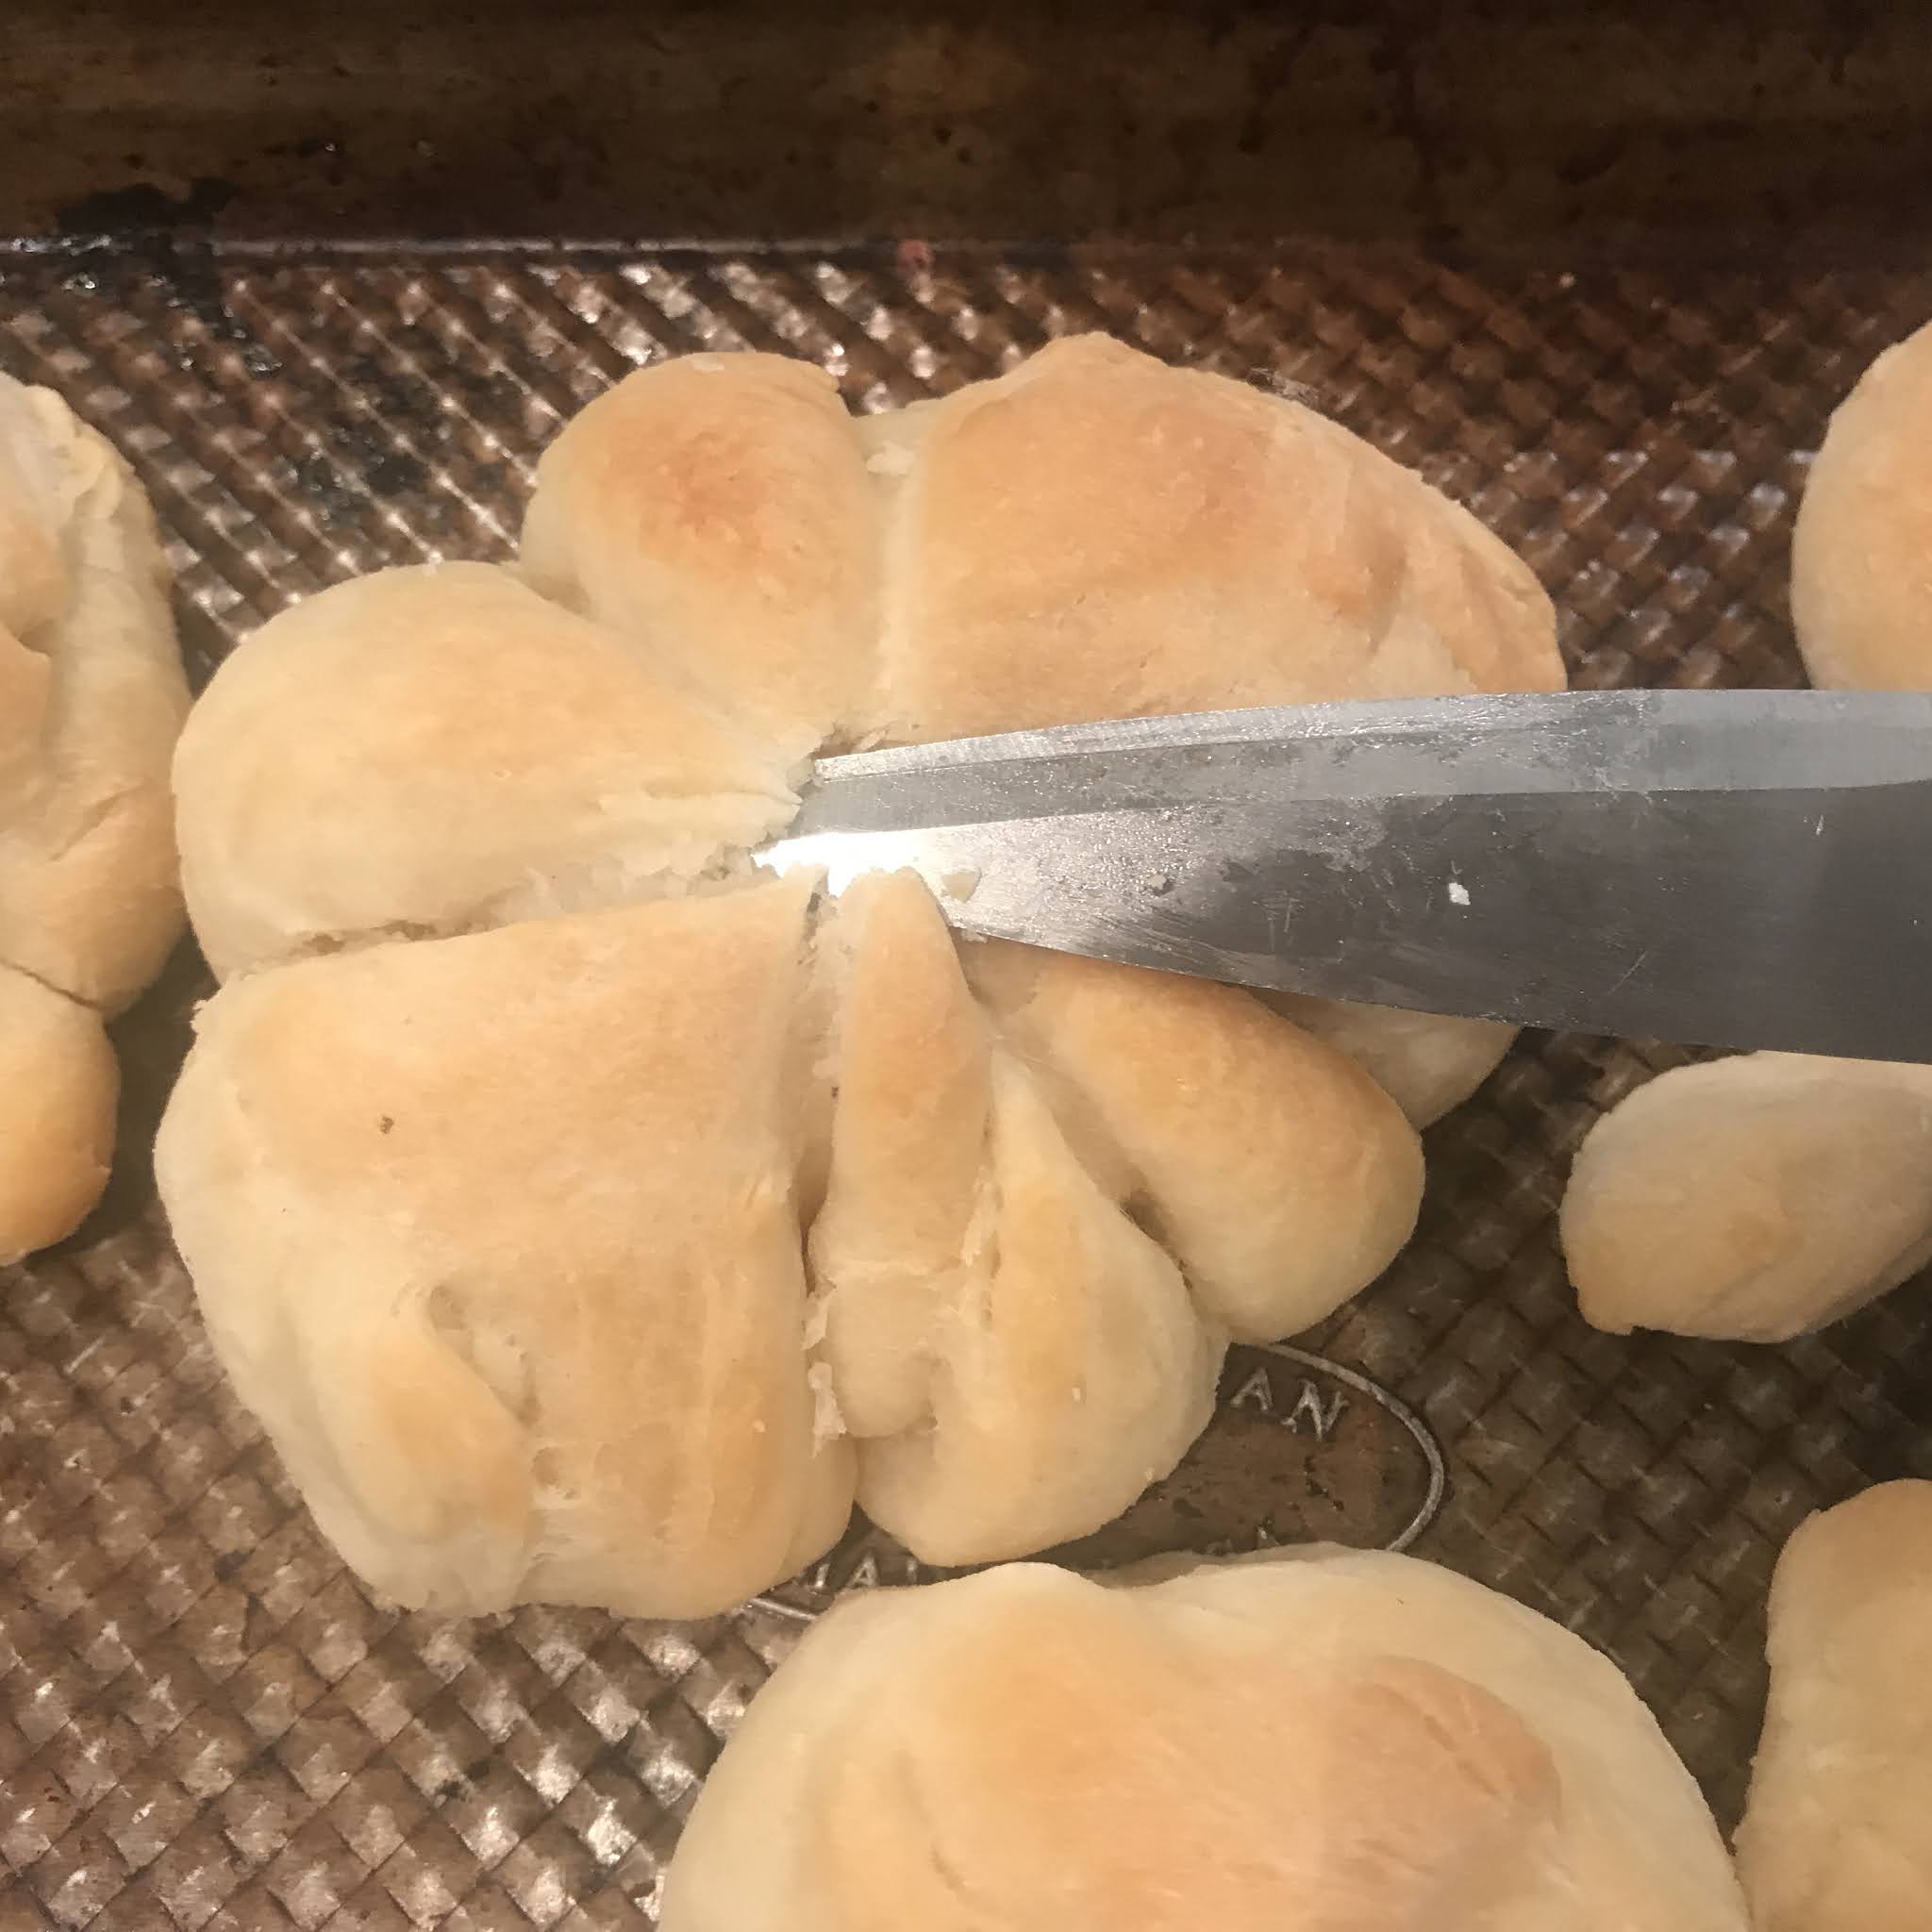
Snip kitchen strings at top. Gently pull to remove string.


Cut a small hole at the top of the roll and insert one stem. Let cool completely.


Fall dinner...


Has arrived...


Saturday, September 26, 2020

OH NO!

0


Technology is great. Until it stops working. Ugh. It is amazing how powerful that tiny little quarter inch square is. That one in the upper left hand corner, yes, the square that turns on your life. Recently, my little square decided to stop working. So it went like this “it might be the...” or “ it could be the ...” or “it may be the...”. All a foreign language to me. So my little square is in the shop. With fingers crossed I hope my Now That You Are Home blog will return soon. Thank you for your kind understanding. I can’t wait to get back!


Saturday, September 12, 2020

FRAME OF MIND

0


I love design. It makes me. Pure bliss. Until that day arrives. The day I realize everything is hideous. The picnic is over, and all the food is gone. Well, of course that is a little harsh, but... When it is time to go it is time to go. Interior design changes just as fast as fashion does. In one season, out the next. Such is the case with most of my picture frames. Recently I woke up and decided all the black frames must go. Time for a new picnic basket.

Good thing I am handy. This quick fix is a great way to change the color of your frames without replacing them. A new look, not better, a more current look. Just follow these little tips and you can transform the look of your frames quickly and easily without having to replace that picnic basket.


This is what you will need-

Frames

Push Pins

Spray Paint- Semi Gloss Finish

I use Rust-oleum spray paint. It usually covers most surfaces with two coats of paint. I love the “white” look but the color selection is limited with spray paints. Most white spray paint is too stark for me. Off white is too yellow. I stumbled on this “Ivory” a very soft white that blends well in many rooms. Actually, it is just perfect.


Disassemble your frames and place on a protected surface. It is best to use spray paint outdoors. Do not paint in direct sunlight. Sunlight instantly dries the fine mist of the spray as you are spraying and can leave a rough texture on the surface of the frame. Also, cooler temperatures are not ideal for paint, temperatures below 65 degrees F will not allow the paint to adhere properly. 


Tap push pins on the back side of the frame. This is to elevate the frame from sticking to the surface and causing rough edges.


Shake the can of paint for a minute or two. Your first coat of paint should be a light coat. Plan on two if not three coats of paint. Point the can away from the frame and start spraying into the air. Once you have a steady stream of spray, start spraying the frame. The first few seconds of spray can have some big particles of paint that might leave a rough texture when dry. Hold the can about 6” away with slow and steady sweeps around the frame. Stop when you have a light first coat. Let dry about ½ hour.

Repeat for a second coat. 


Inspect the frames. If you see any areas that need a bit more paint, this is the time. Check the sides and look for any light spots. Because I am painting a light color over dark, I applied three coats and a little more on a few sides. I let the frames dry overnight, inside.


When the frames are no longer tacky, flip the frames over, let the frames rest on the push pins and finish spray painting.


When you are finished, you will have clean, smooth "factory finished" frames. 


Reassemble your frames and you are done.


Pure bliss...